Tuesday, December 23, 2008
Friday, December 19, 2008
Baked Butternut Squash Soup
I made a pot of this great soup during our recent arctic weather. I love the combination of sweet and savory. It's really versatile and can easily be adjusted to a vegetarian or vegan diet. Enjoy!
Step one:
Quarter the squash. Scoop out the seeds. Turn upside down onto parchment paper-lined cookie sheet. Bake at 350F for 40-45 minutes, until soft.
Step one:
Quarter the squash. Scoop out the seeds. Turn upside down onto parchment paper-lined cookie sheet. Bake at 350F for 40-45 minutes, until soft.
Step two:
Remove from oven. Let cool enough to handle. Scoop the pulp from the skin and place into soup pot.
Remove from oven. Let cool enough to handle. Scoop the pulp from the skin and place into soup pot.
Step three:
Into soup pot, add one quart chicken or vegetable stock, 1 Tbsp. butter (optional), 1/8 tsp garlic powder, 1/8 tsp onion powder, 1/4 tsp dried thyme, and a few sprinkles of black pepper.
Smooth together with immersion (wand) blender. Heat gently (do not boil). Adjust seasoning as desired. (The broth has enough salt in it for me.)
Smooth together with immersion (wand) blender. Heat gently (do not boil). Adjust seasoning as desired. (The broth has enough salt in it for me.)
Step Four:
Ladle into soup bowls and garnish as desired. Options include bacon bits, sour cream, etc. Serve with warm crusty rolls or bread.
Friday, December 12, 2008
Snow Peeps!
I totally love kid art. I love giving kids the opportunity to tap into their creative juices and see what comes out. It's especially rewarding when the kids are delighted with the result.
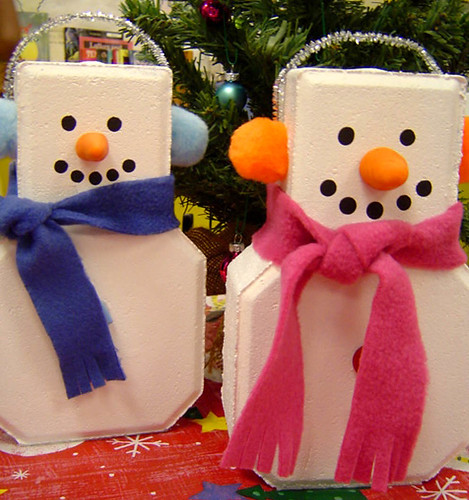
Today our class was taken over by these darling little snow people! The original idea came from FamilyFun Magazine. The classroom teacher and I made a few modifications and ta-dah!!! Just look!!
The adults handled the base painting. We used latex semi-gloss house paint, rolling on three coats. The keystone paving bricks really soaked up the first coats.
The eyes and mouth were painted by dipping the eraser end of a new pencil into black acrylic paint, and just "stamping" dots where desired.
The noses were created with Sculpey clay instead of the modeling clay called for. This was really fun to watch as kids played with the clay and creating silly and serious carrot noses. (Finished noses were baked by the teacher.)
The noses were created with Sculpey clay instead of the modeling clay called for. This was really fun to watch as kids played with the clay and creating silly and serious carrot noses. (Finished noses were baked by the teacher.)
Instead of the SuperGlue the directions called for, we used a hot-glue gun. It worked very well, allowing the kids to glue on their own earmuffs and carrot noses. Additionally, the use of the glue gun eliminated the need for wrapping the rubberband around the earmuffs as suggested in the directions.
We substituted real buttons for the painted-on version. We all agreed this just added to their charm and personality! Each kid had their own reasons for picking specific colors, shapes and types of buttons. Fun!
Subscribe to:
Comments (Atom)


